
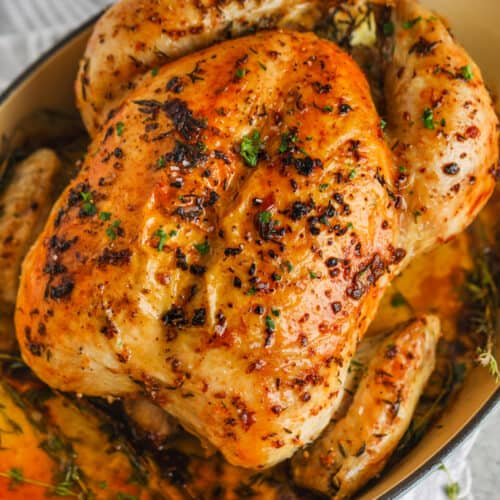
Anyone who loves butter and garlic (and who doesn’t!?) will adore this Garlic Butter Roast Chicken recipe!
A whole chicken is smothered with an easy homemade garlic butter and stuffed with fresh herbs and onion. Then it’s roasted to juicy and tender perfection in the oven.
With just about 5 minutes prep, what could be more mouthwatering than a simple recipe like this one?

A Perfect Roast Chicken Recipe
There are lots of reasons we think this is the best chicken recipe.
- The preparation is so simple, but yields such fantastic results.
- It needs just a few ingredients but packs so much flavor.
- The chicken turns juicy with extra crispy skin, it’s a perfect meal.
- Roast chicken goes with almost any side dish.
- Leftover roasted chicken can be enjoyed hot or used for meal prep or even chicken salad. Save the carcass for Homemade Chicken Stock.

Ingredients
CHICKEN Use a whole chicken for this recipe, preferably between 3½-4 lbs for a quick roasting time. This recipe would work fine with other poultry like a small turkey, grouse, or cornish hen. Just adjust cooking time according to size.
HERBS & ONION No need to make a fancy stuffing. Just stuff the bird with half an onion and some fresh rosemary, thyme, or parsley. These are optional but do add extra flavor to the meat.
GARLIC & BUTTER Garlic and butter are mixed with a bit of olive oil before spreading on the chicken. Feel free to add lemon to the pan as well, or other herbs, plus extra garlic. Add in some kosher salt and a sprinkle of pepper to taste.

How to Make Garlic Butter Roast Chicken
This chicken recipe takes minutes to prep and the rest of the time is hands off.
- Season the chicken and stuff the cavity with herbs and onion.
- Prep the garlic mixture and spread over the chicken or under the skin if desired per the recipe notes below.
- Place the chicken, breast side up, in a roasting pan, put into the oven, and reduce the heat. Roast per recipe below.
Swap out the cast iron skillet for a large rimmed baking pan and add vegetables like potatoes and carrots.

The Drippings
We like to serve this chicken as is and use the pan drippings to drizzle over the meat, cooked rice or mashed potatoes.
Since it’s higher in fat, you can use drippings and browned bits in this recipe to make a roux for gravy with prepared chicken broth.
Tips for Juicy Chicken
- Pat chicken dry thoroughly with a paper towel, inside and out. A dried-off bird ends up juicier on the inside with crispy skin.
- Tie the legs with kitchen twine and tuck the wings under for even cooking.
- Preheat the oven to a 450°F to sear the outside of the chicken. Lowering temperature cooks a bit slower and the result is perfectly tender chicken with crispy skin.
- We love to cook this in a cast-iron dish but an oven safe sauce pan or a casserole dish will work too (no rack is required). Use a larger pan if you’d like to add veggies.
- Cook chicken until the juices run clear and it reaches 165°F on an instant-read thermometer inserted into the thigh (not touching the bone).
- Let the chicken rest 10-15 minutes before carving.

Got Leftovers?
Leftover roast chicken can be kept in the refrigerator in a sealed container for up to four days and can be frozen. The frozen chicken will taste best if used within four months. Add it to Chicken and Wild Rice Casserole or make a tasty Chicken Gnocchi Soup for a whole new meal!
Savory Sides for Chicken
- Parmesan Roasted Brussels Sprouts – so cheesy & delicious
- Creamy Asparagus – made on the stovetop
- Oven Roasted Veggies – sweet & savory
- Roasted Carrots and Parsnips – so easy to make
- Roasted Delicata Squash – elegant yet easy
Did you make this Garlic Butter Roast Chicken? Be sure to leave a rating and a comment below!

Ingredients
- 3 ½ to 4 pound whole chicken
- ½ medium onion
- 4 sprigs fresh thyme or 1 sprig rosemary or parsley
- 2 tablespoons unsalted butter softened
- 1 tablespoon olive oil
- 2 cloves garlic minced, more to taste
- 1 teaspoon kosher salt more to taste
- black pepper to taste
Instructions
- Preheat oven to 450°F.
- Ensure the cavity of the chicken is empty by removing the bag of giblets and neck. (Not all chickens will have these.)
- Dab the chicken dry with a paper towel and season the inside and outside with salt and pepper.
- Cut the onion in half (so you have two quarters of an onion) and place the onion and thyme inside the cavity of the chicken. If the legs are not tied together, use kitchen twine to tie them.
- Combine butter, olive oil, and garlic in a small bowl with 1 teaspoon kosher salt and 1 teaspoon fresh thyme leaves (or ½ teaspoon dried thyme leaves). Mix well.
- Spread the garlic butter mixture over the skin of the chicken *see note. Season with salt and black pepper to taste.
- Place the chicken in a cast iron or ceramic baking dish. Herbs, onions, lemons, & garlic can be added to the pan if desired.
- Place the chicken in the oven and reduce the heat to 425°F. Bake for 45-55 minutes or until the juices run clear and the chicken reaches 165°F.
- Remove the chicken from the oven and let rest 10-15 minutes before serving.
- Serve with the melted garlic butter in the pan if desired.
Video
Notes
- Garlic Butter Option: I prefer to spread the garlic butter mixture over the skin of the chicken. If you'd like, half of the garlic butter can be placed under the skin to infuse the butter into the meat. Use your fingers to gently separate the skin from the breast meat and add the butter mixture under the skin. Massage it around the chicken breast to spread it over the meat between the skin and the meat. Spread a thin layer of the remaining butter mixture over the skin.
- Pat chicken dry with a paper towel, inside and out.
- Tie the legs with kitchen twine and tuck the wings under for even cooking.
- Lemons, additional onion, or garlic can be added to the baking pan if desired.
- Preheat the oven to a 450°F to sear the outside of the chicken. Lowering temperature cooks a bit slower and the result is perfectly tender chicken with crispy skin.
- Cook chicken until the juices run clear and it reaches 165°F on an instant-read thermometer inserted into the thigh (not touching the bone).
- Nutrition information includes half of the butter mixture as not all of it is absorbed into the chicken.
Nutrition Information
Nutrition information provided is an estimate and will vary based on cooking methods and brands of ingredients used.
© SpendWithPennies.com. Content and photographs are copyright protected. Sharing of this recipe is both encouraged and appreciated. Copying and/or pasting full recipes to any social media is strictly prohibited. Please view my photo use policy here.


Hello. I want to add baby potatoes, carrots and celery. When should I add the vegetables so that they’re not mushy?
The vegetables can be added along with the chicken as we do in our roast chicken and vegetables recipe. Enjoy!
I made this for dinner last night and there is very little left for lunch today. This was amazing, but be warned if you make this you will learn how one person can eat a whole chicken in 5 mins
Hi There! If I wanted to put two chickens in the oven at the same time, would I just double the time and keep the temp the same? Thanks!
Two chickens should take about the same amount of time. You’ll want to make sure they aren’t touching (that your pan is large enough) and that they are both on the same rack if possible.
How long do you roast at 450, and what temp do you turn the oven down to finish roasting?
Place the chicken in the oven and reduce the heat to 425°F. Bake for 45-55 minutes or until the juices run clear and the chicken reaches 165°F.
I just made this and it was PERFECT! SUPER juicy, and the skin is nice and crispy! I would recommend putting it on a little rack to raise it off the bottom of the dish, but otherwise, amazingly yummy! will be making them this way from now on, changing up seasonings.
Best Roasted Chicken EVER!!!
I am going to make this a weekly SPECIAL!!! It is GORGEOUS!!! And the TASTE is SUPERIOR on every level.
This looks like a HOLIDAY SPECIAL!!!
Great and easy 5 minute preparation with EXCELLENT directions!!!!
A meat thermometer was a huge help.
I am so glad you loved this recipe Kristin!
This smells and looks incredible!!!!
I used disposable gloves to make hand washing easier!!!
I have a 5 pound chicken in the oven and after 55 minutes, the internal
Temp is 143. Do you recommend that I turn the temperature down to 350?
It should be ok for a few minutes more. You can turn the temperature down or lightly cover the skin with foil if it begins to brown too much.
I’ve been cooking, roasting, grilling etc… chickens for so many years, but following this recipe made the best, most delicious, juicy, flavorful chicken I’ve ever made or had!!! It is such a great way to make your house smell wonderful and like home.
I am so happy to hear you loved this recipe Patricia!
delicous juicy chicken and I used Rosemary instead of thyme and it was finger lickin good!
Can you make this with bone in chicken breasts? It’s what I have in hand without having to run to the market.
Sure you can! The cooking time will change, I would suggest using the cooking times as listed in our split chicken breast recipe. I would suggest cooking in a baking dish (and not a large pan).
I would like to stuff my chicken. How much time should I cook it in the oven for?
You’ll want to cook the chicken until the center of the stuffing reaches 165°F.
I am getting ready to put this baby in, however I always forget how to tell which is the breast side so I take a guess everytime. I cant tell in thepictures. I am sure it will be excellent, my 2 favorite things Garlic and buttermilk .
The plumper side with more flesh is the breast side, it’s a bit rounder and if you are looking at the breast side, you will see the tips of the wings. Hope that helps! Enjoy the recipe.
I made this recipe a week ago, my husband and I enjoyed it so much I am making it again this week! Chicken was very tasty and juicy. I used butter, olive oil, garlic and rosemary from my garden. Inside the cavity I put onion, rosemary and a slice of lemon. I highly recommend this recipe, you won’t be disappointed!
Looking forward to trying this recipe. Do you covet the chicken? Thank you
The chicken is roasted uncovered. Enjoy!
Wow. Fantastic. This came out so yummy. My whole family enjoyed it. There was hardly any leftover!
Hi Holly can I rotisserie this garlic butter chicken instead of roasting it?
That sounds like a delicious idea, Lorraine. I haven’t tried rotisserie cooking this chicken recipe but I am sure it would be delicious.
Amazing! After being deeply disappointed in the last several roasted chickens I made, I went online hunting for a new recipe. I brined my chickens (I made two) ahead of time and followed this recipe almost to the letter… Out of laziness I used garlic infused oil instead of oil and chopped garlic. I only had red onion on hand; and stuffed my bird with lemon and Italian parsley in addition to the onion. Hands down THE best roasted chicken I’ve ever made.
Thank you Meghan, so glad to hear! Thank you for sharing your substitutions.
I made it in my cast iron pan. It was very moist and tasty with crispy skin.
So happy this recipe worked well for you, Kris!
This was an incredibly delicious meal!!
Super easy to put together!! My new-favorite roasted chicken recipe!!
So happy to hear that, Mary! Glad you enjoyed it so much.
Hola!!! Que delicioso, ricoooo, mmmmm,se mira tus recetas y gracias por compartirlos.
Thanks, Carolina! We hope you enjoy them!
Hi Holly!
I took a chicken out of the freezer yesterday to fix tonight, opened my email a bit ago, and this recipe popped up…you must have ESP! I’m making this Garlic Butter Roast Chicken tonight with a big ole baked potato and a veggie.
I’ve made many of your recipes, and absolutely love them all, especially the Air Fryer recipes. I love, LOVE my air fryer.
Thanks for all the delicious recipes, Holly. Keep ’em coming!
Stay safe and be well.
Susie
We are definitely on the same wave length. Thanks, Susie! We hope you enjoyed this recipe too!