
This banana pudding cheesecake recipe is a delish dish everyone will love.
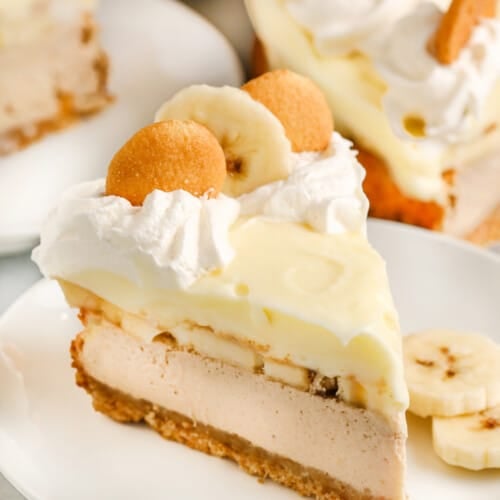
Layers of tangy cheesecake, banana slices, and cookies are topped with banana pudding over a vanilla wafer crust. It’s topped with whipped cream, more bananas, and cookies, what’s not to love?

This post may contain affiliate links. Please read our disclosure policy.
Banana Pudding Cheesecake Is a Family Favorite Because…
- This Southern classic has been given a flavor upgrade with a tart cheesecake balanced with the sweet banana pudding.
- Make banana pudding cheesecake up to two days ahead, and add fresh toppings before serving. The texture and flavor will develop even more.
- Easy to find ingredients. Year-round bananas (and cookies!) make this dessert simple to make at any time.

Banana Pudding Cheesecake Essentials
Nilla Wafer Crust: Nilla wafers pair perfectly with bananas. If you can’t find nilla wafers, try crushed gingersnaps, Vanilla Oreos, or a graham cracker crust.
Bananas: Choose fresh, firmer, just ripe bananas to slice for the decorative layer on top so they hold their shape nicely. Use overripe/ripe bananas for the cheesecake layer. Choose softer bananas with brown spots for a sweeter, more flavorful cheesecake.
Cheesecake: For the best flavor and structure, use full-fat cream cheese over the light version. Let the cream cheese and eggs come to room temperature so they’re easier to blend in Step 3.
Pudding: Use instant pudding mix. Heavy whipping cream beats stiffer than half and half and is used in this recipe for the lightest, fluffiest cheesecake. For the best results, beat the heavy cream until soft peaks form, before it gets too glossy.
Holly’s Favorite Variations
- Top with sprinkles for a birthday pie. Use sliced strawberries or blueberries, mini chocolate, peanut butter, or butterscotch chips in place of bananas for a fun twist.
- Shaved chocolate, toasted coconut flakes, crushed pistachios, and slivered almonds are colorful and tasty toppings, too!
- For a crunchier crust, try adding homemade granola to the crushed Nilla wafers in Step 6.
- For an extra tart cheesecake, Greek yogurt can be used instead of sour cream.


How to Make Banana Pudding Cheesecake
- Crust: Prepare the cookie crust (full recipe below).
- Cheesecake Layer: Blend the cheesecake layer ingredients. Pour over the crust and bake.
- Pudding Layer: Whisk the pudding mixture together and fold in half of the whipped cream.
- Assemble: Place banana slices and crushed cookies over the cheesecake layer and cover with pudding.
Top with the remaining whipped cream, banana slices, and cookies just before serving.


Storing Banana Pudding Cheesecake
Banana pudding cheesecake tastes best when it’s chilled so store it in the refrigerator for up to 2 days. To prevent the final garnishes from getting soggy, add them just before serving.
Delicious Banana Desserts


Did your family love this Banana Pudding Cheesecake? Leave a rating and comment below!

Ingredients
For the Crust
- 1½ cups crushed vanilla wafer cookies (about 50 cookies)
- 3 tablespoons melted butter
For the Cheesecake
- 1 cup mashed bananas about 3 ripe bananas
- 8 ounces cream cheese softened
- 3 eggs
- ½ cup granulated sugar
- ¼ cup sour cream
For the Pudding
- 1½ cups cold milk
- 3.4 ounces instant vanilla pudding mix
- ¾ cup heavy whipping cream
- 2 medium bananas ripe but firm
- ¼ cup crushed vanilla wafer cookies lightly crushed
Instructions
- Preheat the oven to 350°F.
- To make the crust, in a medium bowl combine crushed cookie crumbs and butter. Press into the bottom of an 8-inch springform pan.
- Place mashed bananas, cream cheese, eggs, granulated sugar, and sour cream into a blender. Blend until smooth and pour the mixture into the prepared crust. Bake for 45 minutes or until set. Turn the oven off, open the door slightly, and let cool for 1 hour.
- Transfer to the fridge and cool for at least 2 hours or overnight.
- For the pudding mixture, whisk together milk and vanilla pudding mix. Set aside. In a separate bowl, beat the whipping cream until soft peaks form. Fold ½ cup of the whipped cream into the pudding mixture.
- Refrigerate at least 4 hours.
- Slice the remaining bananas and place over the cheesecake layer. Sprinkle with the crushed Nilla Wafers and top with the vanilla pudding. Decorate the top with remaining whipped cream, banana slices, and cookies before serving.
Notes
Nutrition Information
Nutrition information provided is an estimate and will vary based on cooking methods and brands of ingredients used.
© SpendWithPennies.com. Content and photographs are copyright protected. Sharing of this recipe is both encouraged and appreciated. Copying and/or pasting full recipes to any social media is strictly prohibited. Please view my photo use policy here.


I was wondering if baking the crust before putting in the filling would work. My crust was pretty gooey and when I poured (very carefully!) the cheesecake ingredients into the crust it kind of floated in the cheesecake mixture. The finished product tasted delicious and I would make this again.
I’m glad you enjoyed the recipe! You could try bake this crust if you’d like, we haven’t experienced the same problem although we did press it very firmly so the crust was quite packed. Let us know how it goes!