
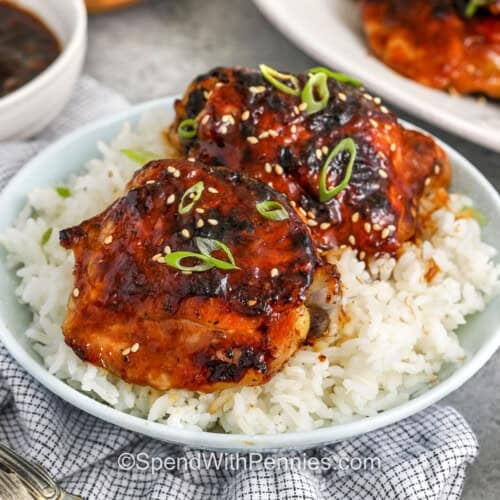
These sticky chicken thighs are delicious with crispy skin and bold flavor in every bite. They’re oven-roasted until juicy with a thick maple-soy glaze that caramelizes as it bakes for the perfect sweet and savory finish.

This post may contain affiliate links. Please read our disclosure policy.
Holly’s Recipe Highlights
- Flavor: A well-balanced sweet and savory glaze made with maple, garlic, and Dijon for depth.
- Skill Level: Simple and beginner-friendly with hands-off oven roasting.
- Swaps: Maple syrup can be swapped with honey, and gluten-free tamari works in place of soy sauce.
- Serving Suggestions: Use extra sauce for drizzling over rice, veggies, or roasted potatoes.

Pantry Staple Ingredients
- Chicken Thighs: Bone-in, skin-on thighs are the best choice for sticky chicken thighs with crispy skin and juicy meat. Boneless chicken thighs can work too, but they will cook faster. Skinless thighs aren’t recommended.
- Garlic: Fresh minced garlic gives the best sharp flavor. Pre-minced can be used for a milder flavor.
- Maple Syrup: Maple syrup gives this recipe its signature sticky-sweet texture and rich flavor. Honey is the close swap, and it tastes great, especially with the tang of apple cider vinegar.
- Dijon: Dijon mustard will emulsify the glaze and add a savory sharpness; whole grain or yellow mustard can work in a pinch.
- Variations: Add in some red pepper flakes for spice, or garnish with sesame seeds and sliced green onions.


How to Make Seriously Sticky Chicken Thighs
- Pat dry, season, and oven-roast the chicken partway.
- Simmer the maple-soy glaze (full recipe below).
- Brush sauce all over the thighs, return them to the oven until the glaze caramelizes and the chicken is cooked through.
- Broil briefly until golden, rest, and serve.

Make the Most of Your Leftovers
These sticky chicken thighs store and reheat beautifully, making them ideal for leftovers or meal prep.
To store, allow the chicken to cool completely, then transfer to an airtight container and refrigerate for up to 4 days. Cooked thighs can also be frozen for up to 3 months, with extra sauce stored separately.
To reheat, pop them in a 350°F oven until warmed through and brush with a little sauce to keep them juicy. Or microwave in short bursts until warm, and then air fry or broil for a couple of minutes to crisp up the skin.
Sticky, Saucy, and Glazed Favorites


Did you make these sticky chicken thighs? Leave a comment and a rating below.

Equipment
Ingredients
For the Chicken:
- 8 bone-in skin-on chicken thighs
- ½ teaspoon kosher salt
- ½ teaspoon black pepper
For the Sauce:
- 1 tablespoon butter
- 2 cloves garlic minced
- ½ cup maple syrup
- ¼ cup soy sauce
- 2 tablespoons apple cider vinegar
- 1 tablespoon Dijon mustard
- 1 tablespoon cornstarch
Instructions
- Preheat the oven to 400°F. Line a large rimmed baking sheet with foil or parchment and spray generously with nonstick spray.
- Pat the chicken thighs dry with paper towels. Season both sides with salt and pepper, then place them skin-side up on the prepared baking sheet. Bake for 35 minutes.
- Meanwhile, in a small saucepan, melt the butter over medium heat. Add the garlic and cook just until fragrant, about 1 minute.
- Whisk in the maple syrup, soy sauce, vinegar, mustard, garlic, and cornstarch. Bring to a low boil over medium heat and continue whisking until thickened, about 3 minutes. Remove from the heat. Set aside ⅓ of the sauce for serving.
- Remove the baking sheet from the oven and flip each thigh. Brush the underside with the maple sauce.
- Flip the chicken again and brush the tops of the thighs generously with the maple sauce.
- Return the pan to the oven and roast for an additional 10 to 15 minutes or until the chicken reaches an internal temperature of 165°F. Broil for 2 to 3 minutes if desired.
- Let rest for 5 minutes before serving. Serve with reserved sauce.
Notes
- Pat the chicken dry for crispy skin.
- Line the pan with foil or parchment to prevent burning.
- If the sauce gets too thick, thin it out with a little water or broth.
Nutrition Information
Nutrition information provided is an estimate and will vary based on cooking methods and brands of ingredients used.
© SpendWithPennies.com. Content and photographs are copyright protected. Sharing of this recipe is both encouraged and appreciated. Copying and/or pasting full recipes to any social media is strictly prohibited. Please view my photo use policy here.


I’m not a fan of chicken thighs, but this recipe changed my mind. This recipe is delicious and easy to prepare. I loved how crispy the skin came out. The sauce was very tasty and I’m looking forward to using it on other dishes.
This recipe was pretty darn good! In general, I don’t eat chicken skin, so crispy skin was a nice treat. I didn’t have quite enough soy sauce on hand, so my sauce turned out a little light. That was my only variation on the recipe. The sauce was very flavorful, all the same; I just added a bit of salt at the table.
On the instructions, it would be handy to be directed to cook the chicken on a shelf a little higher than middle-of-oven. This would mean easy broiling as the last step without having to move the hot pan to a different shelf.
Nan, we are glad to hear that you enjoyed the chicken. Thank you for the cooking tip.
Excellent recipe! Used maple syrup and tamari- topped with smoked sea salt. Definitely a keeper!
Delicious! The recipe has great balance. I followed the recipe exactly except to double the sauce. I used some of the extra for a side of vegetable stir-fry. Everyone loved it! I might need to look for other foods for that sauce…So good!
Great idea to use the sauce on veggies!
Holly, would subbing raw honey for the maple syrup work? Not a big maple flavor gal. Really want to try this recipe!
Yes, the maple syrup can be swapped with honey. Enjoy!
Making this all the time – always getting “oooh” and “ahhh” from everyone.
I am so happy to hear this recipe is a hit George! Thank you for sharing.